1. Select Assignments from the Course Navigation Menu.

2. Click on the + Assignment button.

3. On the next page, enter an Assignment Name.
4. In the Rich Content Editor field, enter instructions for how students must complete or submit their assignments. You can also link to or upload an assignment file and/or rubric by using the Content Selector in the Sidebar.

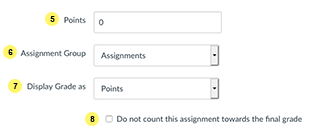
5. Enter Points for the assignment. Note: "Points" represents the scale used to mark the assignment (e.g. /5 or /100), and not the relative weight of the assignment within the course. For assignment weighting, please see the Assignment Groups and Weighted Grades page.
6. Select the Assignment Group from the drop-down menu. The percentage weight within the total of the course can be set by first creating Assignment Groups and assigning Assignment Group Weights.
7. In the Display Grade as drop-down menu, select the method (Percentage, Complete/Incomplete, Points, Letter Grade, GPA Scale, or Not Graded) you want to use for grading.
8. Check the "Do not count this assignment towards final grade" box if you do not want this assignment to be used in the calculation of the students' final grades.

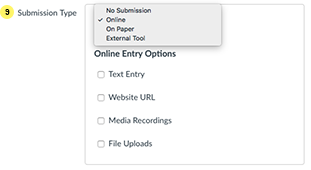
9. Select the Submission Type that you want to accept from the drop-down menu:
- Online (default): allows you to collect student submissions in the form of files, URLs or text entries. NOTE: If you need to restrict the file type, then please consider and communicate to your students all possible file types you would need for example .doc, .docx, .xls, .xlsx, etc.
- No Submission: creates a column in the Gradebook that allows you to give students a grade for an activity with no submission (e.g., participation marks).
- On Paper: creates a column in the Gradebook that allows you to give students a grade for an assessment that is submitted during class.
- External Tool: choose this option when you would like students to submit their assignments using an integrated tool (e.g. peerScholar).

Note: You may want to consider asking students to stick to certain fonts if submitting Word format file submissions in Quercus, as indicated in the link below.
Files and fonts that can be viewed in SpeedGrader
When students submit Word format file submissions in Quercus that contain fonts not listed in the link above, or if you would like them to add layered text or images, the SpeedGrader DocViewer will resize the text, causing it to not be visible.
If you would like students to submit assignments using other fonts than indicated in the link above, or if you are asking them to add layered text or images, then it is recommended that you ask students to create and submit a PDF file for their assignment submission.
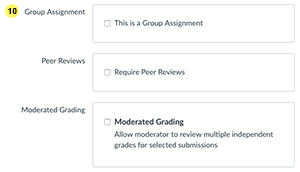
10. Please contact us if you are interested in setting up Group Assignments, Peer Review Assignments, or Moderated Grading.

11. In the Assign to section, you can assign the assignment to an individual student or course section.
Note: If you have a student who has been granted an accommodation from UTM Accessibility Services, please see the Accommodations in Quercus instructions.
12. Enter a Due Date. Submissions can be accepted after this date, but they will be tagged as "Late" in the Gradebook.
Note: Currently, when you download the Gradebook it does not indicate which submissions are late. This information is only available in the Gradebook and SpeedGrader.
13. Enter an Available from and Until date.
Please note: Until = the date and time when students can no longer submit an assignment.
14. Check the "Notify users that this content has changed" check box if you want to notify users when you have made changes to the assignment.
15. Save (create a draft of your assignment so you can publish it later) or Save & Publish the Assignment to make it available to students.

Optional: After you Save or Save & Publish the assignment, you can add a Quercus Rubric.
Click on the link below for more information on creating assignments in Quercus.
CTSI - Assignments
https://teaching.utoronto.ca/tool-guides/quercus-assignment/